Monday, January 14, 2008

Xcode 3 Change: Run Log

Older versions of Xcode had a run log window that let you view the output of command-line programs. Where did it go in Xcode 3?

In Xcode 3 the run log's name has changed to Console and has become part of the debugger window. The console is initially invisible, which makes locating it difficult. There are two ways to reveal the console. First, you can choose Run > Console to show the console, and you will see the console at the bottom of the debugger window. Second, you can drag the splitter bar at the bottom of the debugger window to reveal the console.

Update (January 16, 2008)

Xcode's debugger window has a splitter bar for the console only if you're using Xcode's All-In-One layout. If you're using the Default or Condensed layouts, the console is a separate window. Clicking the Console button on the debugger window toolbar opens the console for the Default and Condensed layouts. 

Friday, January 11, 2008

Xcode 3 Change: Universal Binaries

The Release build configuration for Xcode 3 is set to create 32-bit universal binaries for Cocoa and Carbon application projects. All you have to do is create a Cocoa or Carbon application project, and you're set to build a universal binary. You'll have to modify the Architectures build setting if you want to build a 64-bit version of your application.

Thursday, January 10, 2008

Xcode 3 Change: Release is the Default Build Configuration

In Xcode 3 Apple changed the default build configuration from Debug to Release. This decision does not make much sense. Unless you're writing a simple program, you're going to want to debug your program when you start writing it. Wanting to debug your program means that you want the Debug build configuration, not the Release configuration.

When you create a project with Xcode 3, the first thing you will want to do is change the active build configuration from Release to Debug.

Tuesday, January 8, 2008

Xcode 3 Feature: Version Control Repository Access

Xcode 3 adds support for configuring and viewing version control repositories. With Xcode 3 you can import projects and checkout files inside Xcode. All you have to do from the command line is create the repository. This article will show you how to take advantage of Xcode 3's enhanced version control capabilities. One word of caution. If you hated Xcode's version control support in earlier versions of Xcode, you'll want to stick with the command line. Xcode 3 repository features are a little flaky.

Xcode supports Subversion, Perforce, and CVS. I'm going to focus on Subversion because Mac OS X 10.5 ships with Subversion, and CVS seems to be losing popularity with developers.
 
Step 1: Create the Repository

If you haven't done so already, open the Terminal application and create a repository by running the svnadmin create command. I have detailed instructions you can read (PDF) on creating a repository if you need them. One thing to note is that because Mac OS X 10.5 ships with Subversion, you don't have to install it, and in Mac OS X 10.5 Subversion is in /usr/bin instead of /usr/local/bin.

Step 2: Configure Your Repository

Before you can take advantage of Xcode's repository features, you must configure your repository in Xcode. Launch Xcode and choose SCM > Configure SCM Repositories. A window similar to the following figure will open:


Click the + button to add a repository. You will be asked to name the repository and specify what version control system you're using.

Now you must specify the URL for the repostiory. A local repository's URL starts with file:// and follows with the path to the repository on your hard drive. If the path you specify does not show up in the Path field, you'll have to enter the path to your repository in the Path field.

I have not tried configuring a remote repository, but Xcode's repository configuration window has Host, Port, User, and Password fields. I assume you would fill these fields to configure a remote repository. If you're going to connect to a remote repository using SSH, click the SSH tab in the window. 

Click the OK button, and you've configured the repository.

Step 3: Open the Repositories Window

Choose SCM > Repositories to open Xcode's repositories window, which you can see in the figure below. The repositories window lets you examine the directories inside your version control repositories. Select a repository from the list on the left to examine that repository's directories. Some things you can do from the repositories window is import projects, check files out of the repository, create directories, move directories, and delete directories.
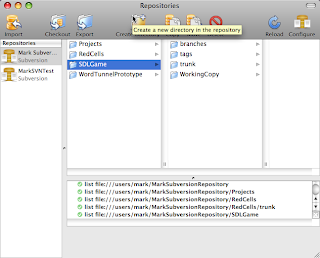
 

If you've created a fresh repository, I strongly recommend creating a directory inside the repository and storing your projects inside that directory. In my experience using Xcode's repository features on a fresh repository, I noticed Xcode let me add only one directory to the root of the repository. Any additional directories I tried to create were created inside the first directory I created. This is why I recommend creating a directory, naming it something like Projects, and import your individual Xcode projects into the Projects directory.

If you have a repository that you've been using for some time, you'll see directories inside the repository root for the projects you have in your repository. If you try to add or import a directory to the repository root, the directory will get added to one of the subdirectories inside the root. There are two solutions.

First, you can fire up Terminal and create a directory from the command line using the svn mkdir command. I had difficulty getting my created directory to appear in the repositories window, but after a few attempts I did get the directory to appear. Second, you can create a fresh repository for your new projects, add a Projects directory to the new repository, and use the new repository for any new projects you want to place under version control.

Step 4: Import the Project

Before importing a project, you must create an Xcode project and move the project's files to a folder. If you follow Subversion conventions, you'll go to your project folder in the Finder and add three folders named branches, tags, and trunk. Move your project files to the trunk folder.

To import a project, select the directory in the repositories window where you want to import the project (If you're following along, this will be the Projects directory you created in Xcode's repositories window) and click the Import button. An Open File dialog opens. Navigate to your project folder, type a comment, and click the Import button.

There should be a directory inside the Projects directory with the name of your project. Inside the project name directory should be the branches, tags, and trunk folders. The trunk folder should contain your project's files. If these folders don't show up, click the Reload button to refresh the repositories window.

Step 5: Check Out Files

After importing a project, you want to check out the source code files in your project. Select your trunk folder in the repositories window and click the Checkout button. A dialog box opens asking you where you want to store the checked out files on your hard drive. Navigate to where you want to store the checked out files. Normally you will store the checked out files in a folder inside your Xcode project's folder. Click the Checkout button. You'll be asked if you want to open the Xcode project. Open it if you want.

Step 6: Turn on Version Control

Although you've imported a project and checked out files, you still have to tell Xcode to use version control for the project you imported. Open the Xcode project (the project file you checked out in Step 5, not the original one you created in Xcode). Select the name of the project from the Groups and Files list and click the Info button on the project window toolbar. An information panel will open. Click the General button in the information panel. Choose your repository from the SCM Repository pop-up menu, and you're ready to use version control with Xcode in Mac OS X 10.5.

Friday, January 4, 2008

Xcode 3 Change: New Template Locations

If you create your own Xcode project and file templates, you should know that Apple changed the location for templates in Xcode 3. For your project templates to show up in Xcode's list when you create a new project, make sure your templates are in the following location:

Developer/Library/Xcode/Project Templates

File templates need to be in the following location:

Developer/Library/Xcode/File Templates

Thursday, January 3, 2008

Xcode 3 Change: No ZeroLink

Apple removed ZeroLink in Xcode 3, which makes my ZeroLink post obsolete for those of you using Xcode 3. Apple says it improved the speed of the linker in Xcode 3 so ZeroLink is no longer needed. 

For the vast majority of developers, getting rid of ZeroLink is a good thing. When you use Xcode 3 to build your project, you will know if you have any link errors. No more Build Succeeded messages followed by crashes and cryptic error messages when your application runs. Another bonus is that you will be able to run the debug versions of your programs outside of Xcode and run them on other people's Macs.

Thursday, December 27, 2007

Setting Up SDL with Visual C++ 2008 Express

Microsoft recently released Visual Studio Express. I wanted to see if my SDL setup instructions for Visual C++ 2005 Express (PDF) worked with Visual C++ 2008 Express so I installed Visual C++ 2008 Express and went through my instructions. The good news is Microsoft did not make a lot of changes in Visual C++ 2008 Express so most of the instructions still apply. There are two differences.

Visual C++ 2008 Express Contains the Win32 SDK

Unlike Visual C++ 2005 Express, Visual C++ 2008 Express ships with the Windows Platform SDK, also known as the Win32 SDK. Visual C++ 2008 Express's Win32 SDK support means you don't have to install the SDK separately, and you don't have to modify any files to get Win32 support.
 
If you're running Visual C++ 2008 Express, you can skip over the Installing the Windows Platform SDK, Updating the Visual C++ Properties File, and Updating the Application Wizard's Settings File sections in my instructions.

The Path to the Win32 SDK is Slightly Different

In the section Telling Visual C++ Where to Find Your SDL Headers and Libraries, I said the path to the Win32 SDK was the following path:

C:\Program Files\Microsoft Platform SDK

If you install Visual C++ 2008 Express, you'll find the Win32 SDK at the following path:

C:\Program Files\Microsoft SDKs\Windows\v6.0A

The v6.0A is the Win32 SDK version. If you're reading this in the future, the version number may change.

Wednesday, December 26, 2007

I've Installed Xcode 3

I installed Mac OS X 10.5 and Xcode 3 last night so I can now answer Xcode 3 questions. As I spend more time with the new Xcode Tools, I will take note of changes Apple made in Xcode 3 and write about them here.

Tuesday, December 11, 2007

Changing SDL's Working Directory on Mac OS X

The Mac OS X version of SDL sets the working directory to the directory containing the application bundle. This default behavior makes loading images and sounds more difficult because the images and sounds most likely reside in the application bundle's Resources folder. What would be nice would be to set the working directory to the Resources folder. How do you do this?

You change the working directory by modifying the method -setupWorkingDirectory: in the file SDLMain.m. You'll want to change the code in SDLMain.m in SDL's Xcode templates so your changes take effect for any new SDL projects you create. Just to be safe, you should comment out the original code or save a copy of it so you can go back to the original if things go wrong. Enter the following code in the -setupWorkingDirectory: method:


NSString *resourcePath = [[NSBundle mainBundle] resourcePath];
[[NSFileManager defaultManager]
changeCurrentDirectoryPath
:resourcePath];


Thanks to Keith Bauer, aka OneSadCookie, for the source code to change the working directory.

Thursday, December 6, 2007

New Article: Playing Audio Files with QTKit

I have a new article on my website that explains how to load and play audio files using the QTKit framework. It should be especially helpful to any Cocoa developer who wants to loop an audio file because information on looping was hard to find in Apple's QTKit documentation.