Thursday, December 27, 2007

Setting Up SDL with Visual C++ 2008 Express

Microsoft recently released Visual Studio Express. I wanted to see if my SDL setup instructions for Visual C++ 2005 Express (PDF) worked with Visual C++ 2008 Express so I installed Visual C++ 2008 Express and went through my instructions. The good news is Microsoft did not make a lot of changes in Visual C++ 2008 Express so most of the instructions still apply. There are two differences.

Visual C++ 2008 Express Contains the Win32 SDK

Unlike Visual C++ 2005 Express, Visual C++ 2008 Express ships with the Windows Platform SDK, also known as the Win32 SDK. Visual C++ 2008 Express's Win32 SDK support means you don't have to install the SDK separately, and you don't have to modify any files to get Win32 support.
 
If you're running Visual C++ 2008 Express, you can skip over the Installing the Windows Platform SDK, Updating the Visual C++ Properties File, and Updating the Application Wizard's Settings File sections in my instructions.

The Path to the Win32 SDK is Slightly Different

In the section Telling Visual C++ Where to Find Your SDL Headers and Libraries, I said the path to the Win32 SDK was the following path:

C:\Program Files\Microsoft Platform SDK

If you install Visual C++ 2008 Express, you'll find the Win32 SDK at the following path:

C:\Program Files\Microsoft SDKs\Windows\v6.0A

The v6.0A is the Win32 SDK version. If you're reading this in the future, the version number may change.

Wednesday, December 26, 2007

I've Installed Xcode 3

I installed Mac OS X 10.5 and Xcode 3 last night so I can now answer Xcode 3 questions. As I spend more time with the new Xcode Tools, I will take note of changes Apple made in Xcode 3 and write about them here.

Tuesday, December 11, 2007

Changing SDL's Working Directory on Mac OS X

The Mac OS X version of SDL sets the working directory to the directory containing the application bundle. This default behavior makes loading images and sounds more difficult because the images and sounds most likely reside in the application bundle's Resources folder. What would be nice would be to set the working directory to the Resources folder. How do you do this?

You change the working directory by modifying the method -setupWorkingDirectory: in the file SDLMain.m. You'll want to change the code in SDLMain.m in SDL's Xcode templates so your changes take effect for any new SDL projects you create. Just to be safe, you should comment out the original code or save a copy of it so you can go back to the original if things go wrong. Enter the following code in the -setupWorkingDirectory: method:


NSString *resourcePath = [[NSBundle mainBundle] resourcePath];
[[NSFileManager defaultManager]
changeCurrentDirectoryPath
:resourcePath];


Thanks to Keith Bauer, aka OneSadCookie, for the source code to change the working directory.

Thursday, December 6, 2007

New Article: Playing Audio Files with QTKit

I have a new article on my website that explains how to load and play audio files using the QTKit framework. It should be especially helpful to any Cocoa developer who wants to loop an audio file because information on looping was hard to find in Apple's QTKit documentation.

Monday, October 29, 2007

I Don't Have Leopard Yet

Because I don't have Leopard yet, I don't have Xcode 3 so I can't answer your Xcode 3 questions. You can still ask them if you want, if you don't mind the response "I don't know". Apple has an Xcode mailing list where you can ask Xcode 3 questions as well as questions on other Apple developer tools like Interface Builder.

I will post on the blog when I get Leopard, also known as Mac OS X 10.5.

Thursday, October 11, 2007

New Article: Mac Game Programming Roadmap

I have a new article available that provides an overview of the technologies to learn to write Mac games. The article was motivated by a discussion that has been brewing on Apple's game development mailing list for several list. The discussion revolved around Apple's lack of support for games, and one complaint was that Apple did not have a game library like DirectX. Without a game library getting started with Mac game development can be difficult because he or she may not know where to begin. My article helps them know where to begin. If you're new to Mac game development, check out the article.

Monday, September 10, 2007

Changing the Application Name for an Xcode Project

Note: I got about 95% finished with this post when I realized it should be on the Xcode Tools Tips page. Because I was almost finished, I decided to also post it on the blog.

When you create an Xcode project, Xcode uses the project name as the title of whatever it builds. If you create an Xcode application project named MyProject, Xcode will create an application named MyProject when you build the project.

Suppose you're working on your application for a few weeks when you discover the perfect name for your application. You change the name of your project from MyProject to PerfectName, clean your project, and rebuild it. You expect to find an application named PerfectName in your build folder, but the application is still called MyProject. How do you get Xcode to build the project so the application name is PerfectName?

The answer is to modify the Product Name build setting, which you can find in the Packaging build settings collection. Product Name is the name of what Xcode builds, such as an application, a framework, or a library. Xcode initially uses the project name as the product name so when you look at the Product Name build setting, it will most likely be blank. Change the value of the Product Name to what you want, which would be PerfectName in this ongoing example.

When you change the Product Name build setting, you'll want to change it for the target, not a single build configuration. Changing the Product Name build setting for the target makes sure the change takes effect for all build configurations.

Monday, August 20, 2007

Setting up Visual C++ on Windows Vista

I have instructions on setting up Visual C++ 2005 Express for SDL and OpenGL on my OpenGL 2D book site. I based those instructions on what I had to do to set up Visual C++ on my brother's computer running Windows XP. When I used the instructions to set up Visual C++ on my Windows Vista virtual machine, a major problem occurred. Visual C++ crashed every time I tried to add an existing file to a project. The crashes occurred because I hadn't installed the necessary service packs.

There are two service packs you must install for Visual C++ to work with Vista. The first is Visual C++ 2005 Express Service Pack 1. The second is Visual Studio 2005 Service Pack 1 Update for Windows Vista. Both of these service packs can be downloaded at Microsoft's developer site.

Friday, August 17, 2007

Moving a Subversion Repository to a New Computer

I recently got one of the new iMacs, and I had to move my local Subversion repository to the new Mac. Getting the repository to the new Mac was a little tricky. Most of the Subversion tutorials on the Internet deal with creating a repository from scratch so I figured an article on moving a Subversion repository to a new computer would help people.

Moving the Repository

Moving a repository to a new computer requires three steps.
  1. Dump the repository's contents to a file.
  2. Create a repository on the new computer.
  3. Load the repository with the contents of the dumped file's contents.
Run the command svnadmin dump to dump the contents of a repository to a text file. Navigate to the directory above the repository, and run svndadmin dump.

svnadmin dump RepositoryName > DumpFile

Running svnadmin dump like I just did will write the contents of your repository to a file called DumpFile. Ideally you would dump the repository contents before you get your new computer and copy the dump file to your new computer. But I was able to copy my repository folder to the new computer and run svnadmin dump on the new computer.

After creating the dump file, run the command svnadmin create to create a new repository. Navigate to where you want the repository to reside and enter the following command:

svnadmin create RepositoryName

Now it's time to fill the newly created repository with the contents of the dump file. Run the command svnadmin load to fill the repository.

svnadmin load RepositoryName < DumpFile

Now you've managed to copy the repository over to the new computer.

Changing the Repository's Path

After recreating my old repository, I opened an Xcode project that was in the repository to see if the version control information was appearing in Xcode. The only information that was appearing was the files' local revision numbers. There was no information on previous versions of the project's files.

The cause of the problem was the repository path on the new computer did not match the path on the old computer. I needed to tell the files in the repository the new path to the repository.

The svn switch command accomplished this task. To tell the files the new repository path, move to the directory where the project's files reside and run the svn switch command using the --relocate option. When using the --relocate option, you first supply the old repository path, then the new path.

svn switch --relocate /Path/On/Old/Computer /Path/On/New/Computer

After running svn switch, all the version control information began to appear in Xcode.

Tuesday, July 31, 2007

SDL 1.2.12

The latest version of SDL, 1.2.12, is available to download from the SDL website. Anyone using Mac OS X and supporting joysticks in their game should download the update because it fixes a joystick calibration bug. When starting a game, SDL would record joystick axis events when the joystick was not moved, causing movement in the game with no joystick movement. The only way to stop the unwanted movement was to move the joystick up, down, left, and right. The 1.2.12 update eliminates the unwanted movement, making joysticks work the way you would expect on Mac OS X.

Wednesday, June 20, 2007

Reducing Xcode's Window Clutter

If you do a lot of work in Xcode, your desktop can quickly become cluttered with windows, which can make finding the window you want difficult. This post shows you what you can do to reduce the number of open windows in Xcode.

Grouped Editor Windows

When you open an editor window by double-clicking a source code file in the project window, you will notice a toolbar button in the upper right corner of the window. The button's text will say either Grouped or Ungrouped. Clicking the button changes the text from Grouped to Ungrouped and vice versa.

Grouped editor windows tell Xcode to open only one editor window. When you double-click a source code file in the project window, Xcode places the contents of the file in the single editor window. Ungrouped editor windows tell Xcode to open a new editor window every time you double-click a source code file in the project window. Grouping editor windows eliminates a lot of window clutter.

Editing in the Project Window

If a single editor window is too much clutter for you, you can edit source code in the project window. Click the Editor button in the project window toolbar to open an editor in the project window's detail view. Clicking the Editor button a second time brings back the original detail view.

All-In-One Layout

The first two tips eliminate the clutter of editor windows. But Xcode's default layout still creates lot of external windows: run log, debugger window, build results window, search results, and SCM results. How do you keep all these windows from opening? The solution is to switch to Xcode's All-In-One layout, which places all the external windows in the project window.

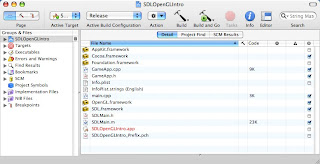
To switch to the All-In-One layout, open Xcode's preferences window by choosing Xcode > Preferences. Click the General button in the preferences window toolbar. Choose All-In-One from the Layout pop-up menu. The following screenshot shows what the All- In-One layout looks like.


The All-In-One layout looks similar to the default layout, but you will notice a Page area in the upper left corner of the project window with three buttons. The left button is the Project page, which looks like the default layout, but with two tabs for search results and SCM results. The center button is the Build page, which gives you access to the run log and build results window. The right button is the Debug page, which gives you access to the debugger window.

Thursday, May 31, 2007

New Xcode Tip: Supplying Launch Arguments for Command-Line Programs

I added a tip to the Xcode Tools Tips page on supplying launch arguments for command-line programs from Xcode. This information is tucked away in the excerpt from the Xcode chapter, but it's difficult to find. I saw a question about supplying launch arguments on a message board, and another person emailed me about it. When multiple people have the same question, it makes sense to add a tip so everyone can benefit.

Wednesday, May 16, 2007

New Xcode Tip: Changing the Executable Name

I added a new tip to the Xcode Tools Tips page on changing the executable name in your Xcode projects. If you don't want to read the whole tip, I can summarize it in one sentence. Change your target's Product name build setting, which is part of the Packaging collection.

Thursday, May 10, 2007

New Bundles Article

I have a new article on bundles available. It introduces bundles, focusing on application bundles. After reading the article, you will know how to create a bundle, add files to the bundle, and retrieve files from the bundle.

Monday, April 23, 2007

Leopard Delay a Blessing for Me

Apple did me a favor as a writer by delaying the release of Mac OS X 10.5 from June to October. With a June release I would have had a difficult decision to make: delay updating Xcode Tools Sensei until I finished the OpenGL book, or delay development on the OpenGL book to update the Xcode book. Apple gave me another four months to finish the OpenGL book.

All updates for Xcode 3 and Leopard will come in a new edition of Xcode Tools Sensei. Xcode and Interface Builder are going to have major updates. Trying to juggle Xcode 1.x, 2.x, and 3 in one text would be difficult for me to write and you to read. I also will have to take a bunch of new screenshots so it makes sense to have two versions of the book: the current version that supports Xcode 1.x and 2.x, and a new version specifically for Xcode 3. The electronic edition of the Xcode 3 version would be available at a discount for everyone who has the current version of the book.

Wednesday, April 4, 2007

Skim PDF Viewer

Skim is a free, open-source PDF viewer for Mac OS X. Mac OS X comes with Preview, which views PDF files, and Adobe Acrobat Reader is freely available so what makes Skim special? Skim has features that make reading technical articles and academic papers easier.

The first of these features is the ability to add notes to a PDF document. It's the electronic equivalent of adding sticky notes to a paper document. When you're reading difficult material, being able to make notes to yourself helps in understanding the material.

A second useful feature is the ability to highlight areas of text by putting a circle or box around it. A third feature is snapshots, which let you keep important pieces of a document in easy reach.

Skim is at version 0.2, which means it's far from a finished product. But if you read a lot of PDF technical articles, you should give Skim a test drive.

Monday, April 2, 2007

Using Saturn on Intel Macs

I read a post on Apple's performance and optimization mailing list that tells you what to do to use Saturn on Intel Macs. This information may be useful to some of you so I am writing about it here.

To use Saturn to profile your code, you must compile your code with either the -pg compiler flag (Generate Profiling Code build setting in Xcode) or the -finstrument-functions compiler flag. The -pg compiler flag is the flag most people use, but Apple hasn't added the support for -pg on Intel Macs yet so using the -pg flag won't allow you to run your code with Saturn on an Intel Mac.

The solution is to use the -finstrument-functions flag to compile your code. I didn't see an Xcode build setting for this flag so you'll have to add the flag to the Other C Flags or Other C++ Flags build setting in Xcode.

I don't have an Intel Mac so I can't test this for myself, but the information came from an Apple engineer so I will assume the information is accurate.

Friday, March 30, 2007

OpenGL Book Progress Report for March 2007

I haven't posted anything about the OpenGL book for a while, but I am writing to let you know I am still working on it. Progress has been excruciatingly slow, which has been very frustrating to me. On the code front, I've been working on the physics code. On the writing front, I have a lot of material written on several chapters, but I still don't have a finished chapter. Whenever I write about something, it brings up several additional topics I have to write about. When I write about those topics, it brings up more things to write about, which makes finishing difficult.

Wednesday, February 28, 2007

I'm Changing Website Hosts

I have started moving the Me and Mark Publishing website to a new host. Everything should be transferred within the next 1-2 days. Hopefully there won't be any problems. I will add an item to the Latest News section about the switch. If you see the item on the Me and Mark Publishing home page, you're viewing the site with the new host.

Monday, February 19, 2007

Seeing Xcode's Build Errors

When you build an Xcode project, Xcode tells you whether or not the build succeeded. If the build succeeded, that's all you need to know, but if the build failed, you want to know what the errors are so you can fix them. Xcode has two places to look at your errors: the Errors and Warnings smart group and the build results window.

Errors and Warnings Smart Group

In the project window's Groups and Files list, you will see the Errors and Warnings smart group. Select the Error and Warnings group and the project window shows the build errors. Double-clicking an error or warning takes you to the line of code where the error occurred.

Build Results Window


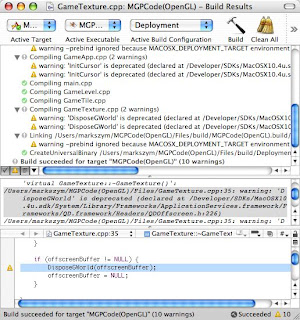
When you need to see more detailed information about your build, use the build results window. Choose Build > Build Results to open the build results window. The build results window has three sections. The top section is the build results, which shows the high-level build steps. The middle section is the build transcript, which shows the low-level steps Xcode takes to build your project. The bottom section is the editor. Selecting an error from the build results or the build transcript shows the line of code in the editor where the error occurred.

Showing the Build Transcript

If you open the build results window for the first time, you won't see the build transcript. The build transcript is initially invisible, and you must tell Xcode to show it. Below the build results are four small buttons. Click the third button to show the build transcript.

Wednesday, January 31, 2007

Writing C++ Programs on Mac OS X

A frequently asked question on Mac programming forums is "Can I write C++ programs on Mac OS X?". Yes, you can write C++ programs on Mac OS X

Install the Xcode Tools

The Xcode Tools contain everything you need to write Mac OS X applications, including C++ programs. Every copy of Mac OS X contains the Xcode Tools. If you have Mac OS X 10.4, there should be an item called Xcode Tools on the Mac OS X DVD. This item contains the installer. Older versions of Mac OS X that ship on multiple CDs contain either an Xcode Tools or Developer Tools CD.

Apple frequently updates the Xcode Tools so the version that shipped with your copy of Mac OS X is most likely not the most recent version. If you have a broadband Internet connection, I recommend going to Apple's developer page and signing up for a free ADC membership. After signing up for an ADC membership, you can download the most recent version of the Xcode Tools.

One common concern people have when installing the Xcode Tools is the size of the install. The easy install of the Xcode Tools is over 1.5 GB, which is overkill if all you want to do is learn C++. You can perform a custom install of the Xcode Tools to reduce the size of the install. If you are low on disk space, the easiest way to save space is to not install the developer documentation. The developer documentation takes about 1 GB of disk space, and you can view all the documentation online anyway.

Writing Standard C++ Programs

The people most likely to ask if they can write C++ programs on Mac OS X are Mac-using college students who are taking a class on C++ programming. C++ programming classes normally teach standard C++, which will run on most operating systems, including Mac OS X.

To write a standard C++ program with Xcode, you must create a C++ Tool project. C++ Tool projects are used to write command-line programs without a GUI, which makes programming easier. You can read an article on the Xcode Tools Sensei page that contains detailed instructions on creating and building a C++ Tool project.

Writing C++ GUI Programs

After learning C++ you may want to use your newfound knowledge to write Mac OS X GUI programs. You have three options for writing Mac GUI applications in C++. First, you can use Cocoa, writing your user interface code in Objective C and the rest of your code in C++. You must give your Objective C files the extension .mm, which tells Xcode to treat them as Objective C++ files. Objective C++ lets you mix C++ and Objective C code in the same source file.

Second, you can use Carbon, which is Apple's C API for writing GUI applications. If you choose to use Carbon, you may want to look into Nano, an open-source C++ framework built on top of Carbon.

Third, you can use a C++ cross-platform GUI framework like Qt or wxWidgets. I haven't used either of these frameworks, but you should check them out if you are interested in supporting Linux and Windows as well as Mac OS X.

Monday, January 15, 2007

TextWrangler and Interpreted Languages

TextWrangler is a free text editor for Mac OS X. It also happens to be a nice development environment for interpreted languages, especially for Perl, Python, and Ruby programming.

TextWrangler's Advantage over Xcode for Interpreted Languages

Xcode is designed for compiled languages like C++ and Java, not interpreted languages like Python and Ruby. You can create an external build system project in Xcode, but it is not very useful for interpreted languages because there is nothing to build for interpreted languages. You have to run the Terminal application and launch your program from the command line using your language's interpreter.

TextWrangler's shebang (#!) menu allows you to run Unix scripts from TextWrangler so you don't have to launch Terminal. TextWrangler has built-in support for Perl, Python, and Ruby, which means you can run and debug Perl, Python, and Ruby programs from TextWrangler. You can use TextWrangler to run programs in other interpreted languages, but you can't debug them using TextWrangler's Run in Debugger menu item.

Creating and Running a Program with TextWrangler

Writing and running code in interpreted languages is easy in TextWrangler. The following steps show you how to write a simple Ruby program with TextWrangler:
  1. Choose File > New Text Document.
  2. At the bottom of the document window are three pop-up menus. The left menu should say (none). Choose Ruby from the left pop-up menu. This tells TextWrangler that you are writing a Ruby program, which turns on Ruby syntax highlighting and enables the Run in Debugger menu item.
  3. Write your code. For a Hello World program, enter puts "Hello World".
  4. Choose #! > Run to run the program.
The instructions for Perl and Python are similar. For Step 2 you would choose either Perl or Python from the pop-up menu and write Perl or Python code instead of Ruby.

If you are using another interpreted language, the first line of code must specify the path to the interpreter.

#!/path/to/interpreter

The #! sequence is the start of a Unix script.

Using TextWrangler with Xcode

Although you don't need Xcode for small projects if you use TextWrangler, Xcode has its place for larger projects. You would use Xcode for project organization and version control and use TextWrangler to write the code and run the program. The Xcode Tools Tips page has a tip on using external editors with Xcode.

Monday, January 8, 2007

ZeroLink

I read many posts on Mac programming message boards about problems that end up being caused by ZeroLink. Responding to these posts gets tiresome after a while so I decided to write about ZeroLink. In this post I explain what ZeroLink does, the problems it causes, and how you can turn it off so it doesn't cause you problems.

What ZeroLink Does

Before I explain what ZeroLink does, I should explain how Xcode normally builds C, C++, and Objective C projects. When you tell Xcode to build your project, the compiler compiles each source code file, creating an object file for each source code file. After compiling each file the linker links each object file along with the libraries and frameworks you're using to create an executable file you can run.

As its name suggests, Xcode skips the linking stage when you build with ZeroLink. When you run your program built with ZeroLink, Xcode links object files when your program needs them.

What is the advantage of using ZeroLink? It makes building your project go faster. If your project has many source code files, ZeroLink can speed build times significantly. During development you're going to build your project many times so faster build times save you time.

ZeroLink's Dark Side

ZeroLink's build time savings have a cost. The cost is you can get bizarre program behavior, and the cause of this behavior can be difficult to find. There are two common problems ZeroLink causes. First, because ZeroLink skips the linking stage, you won't find any linker errors when you build your project. The error appears when you run the program in Xcode, and your program crashes.

Second, your program won't launch when you move the executable or try to run it on another Mac. Projects built with ZeroLink can be run only inside Xcode. Because ZeroLink doesn't do any linking, the executable file is just a shell. When you move the executable file and try to launch it, nothing happens because there's no code inside the executable file. The code is in the object files that haven't been linked.

The Cause of Confusion

ZeroLink-related problems occur most often for people new to Xcode, and it's not their fault. When you create a new Xcode project, Xcode sets the project's active build configuration (the configuration it will use when you build the project) to the debug configuration. The debug configuration initially enables ZeroLink. What this means is if you create an Xcode project, add code to the project, and build the project, you're building with ZeroLink, whether you intended to or not.

Most Xcode beginners do not intend to use ZeroLink and have no need for it. Unless you have a large project, the problems ZeroLink causes surpass the time saved by not linking. While ZeroLink has its place, most developers are better off not using it, and Apple would be better off turning off ZeroLink initially.

Turning off ZeroLink

Because Apple enables ZeroLink initially, it is up to you to turn it off. If you're running Xcode 2.2 or later, the easiest way to turn off ZeroLink is to choose Build > Allow ZeroLink. Make sure there is no check mark next to the menu item. No check mark means ZeroLink is turned off. When you turn off ZeroLink using this method, you can't use ZeroLink for any project. If you decide you want to use ZeroLink in the future, choose Build > Allow ZeroLink to give yourself the capability of turning ZeroLink on or off on a project by project basis.

If you're running an earlier version of Xcode, you must turn off the ZeroLink build setting for each project. The ZeroLink build setting is in the Linking build settings collection.
Wednesday, January 3, 2007

Linking External Libraries and Frameworks in Xcode

As long as you stick with the Apple-supplied frameworks that reside in System/Library/Frameworks (Cocoa, Carbon, OpenGL, QuickTime, etc.), linking in Xcode is pretty simple. Add the framework to your project, and you're done.

Things get a little more complicated when you want to use other libraries and frameworks in your code. If you're new to Xcode, you may get a ton of undefined symbol linker errors when you build your project, with the undefined symbols being in the the libraries and frameworks you want to use. These errors mean the linker can't find the symbols. How can you eliminate these errors?

Add the Libraries and Frameworks to Your Project

It sounds obvious, but make sure you have added the external libraries and frameworks to your project. If you don't add them, your project will not link.

Add Search Paths

If you have added the libraries and frameworks to your project and you still get undefined symbol errors, the most likely cause is the linker can't find the libraries and frameworks. What you need to do is add search paths for the libraries and frameworks you're using.

Xcode has a Search Paths build settings collection. This collection lets you add search paths for libraries, frameworks, and header files. To add a search path, select the appropriate build setting and click the Edit button. A sheet will open. Click the + button in the sheet to add a search path, and click the OK button when you're done.

Linker Flags

Adding search paths eliminates most linker errors, but when it fails, you can add linker flags to the project. To add linker flags go to the Linking build settings collection. The Other Linker Flags build setting lets you manually add flags the linker will use when building your project.
If you still get linker errors, you're in for a long, frustrating search for a solution.

Tuesday, January 2, 2007

Updated Tip on Changing the Compiler

I updated the tip on the Xcode Tools Tips page that deals with changing the compiler Xcode uses to build your project. The updated tip tells you to add the build settings GCC_VERSION_ppc and GCC_VERSION_i386 instead of changing rules for the target. There currently is no need for the GCC_VERSION_i386 setting because Xcode projects use gcc 4 as the default compiler and you can't build for Intel with anything earlier than gcc 4. But the setting will come in handy in the future when Xcode ships with a newer version of gcc.

There was nothing technically wrong with having a target rule that specified the compiler to use, but it was overkill when all you want to do is compile with an earlier version of gcc. Adding the GCC_VERSION_ppc build setting is more straightforward.